Open post

frozen chicken pot pie cooking instructions

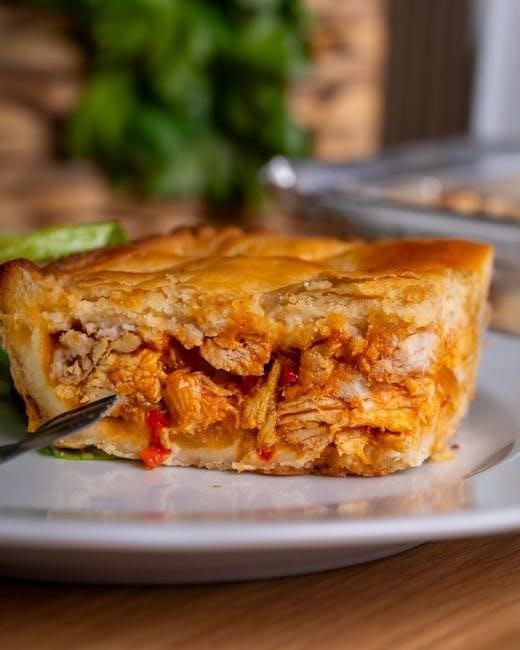
Overview of Frozen Chicken Pot Pie Cooking

Cooking a frozen chicken pot pie is a convenient and flavorful solution for a quick meal. It transforms from a frozen state to a golden, delicious masterpiece with proper baking techniques, ensuring a crispy crust and hot, bubbly filling every time. Perfect for busy households, it offers comfort food at its finest;

1.1 Importance of Following Cooking Instructions

Adhering to the cooking instructions ensures the frozen chicken pot pie is cooked evenly and safely. Proper baking prevents undercooked fillings and overcooked crusts, while reaching the safe internal temperature of 165°F avoids foodborne illness. Following package guidelines guarantees a golden-brown crust and a hot, bubbly filling, making the dish both delicious and secure for consumption. Deviating from instructions risks an unsatisfactory texture and potential health hazards.

1.2 Benefits of Cooking Frozen Chicken Pot Pie

Cooking a frozen chicken pot pie offers convenience, as it requires minimal preparation and time, making it ideal for busy individuals. It provides a consistent taste and texture, ensuring a satisfying meal every time. Additionally, it can be cost-effective and reduces food waste. The process is straightforward, suitable for those with limited culinary skills, and offers the comfort of a homemade meal without the hassle of from-scratch preparation.

Oven Cooking Instructions for Frozen Chicken Pot Pie

Preheat your oven to 375°F (190°C). Place the frozen pie on the middle rack and bake for 40-50 minutes, or until golden brown and bubbling.

2.1 Preheating the Oven

Preheating the oven is a crucial step for cooking a frozen chicken pot pie. Set your oven to 375°F (190°C) to 400°F (200°C), depending on the brand instructions. Allow the oven to preheat for at least 30 minutes to ensure it reaches the correct temperature. This step ensures even cooking, preventing the crust from sagging and helping the filling cook properly. A properly preheated oven is key to achieving a golden-brown crust and a hot, bubbly filling.

2.2 Baking the Pie

Place the frozen pie on a lined baking sheet and cover with foil. Bake in a preheated oven at 375°F (190°C) for 30-40 minutes. Remove the foil to allow the crust to brown. Continue baking for an additional 10-20 minutes, or until the crust is golden and the filling is bubbly. Ensure the internal temperature reaches 165°F for safety. Place the pie on the middle rack for even cooking.

First, I’ll think about what achieving a golden-brown crust involves. From the previous information, I saw mentions of covering the pie with foil initially and then removing it to let the crust brown. So, that should be included. Maybe also about baking times and temperatures, but I need to be careful not to overlap with other sections like baking instructions or oven temperatures.

I should check the provided internet content to see what tips are there. There were mentions of preheating the oven, placing the pie on the middle rack, and ensuring the internal temperature is correct. Also, some sources talked about covering the pie for part of the cooking time to prevent burning.

I remember that in the previous response, the assistant mentioned removing the foil to allow browning and continuing baking until golden. That makes sense. I should also include a tip about placing the pie on the middle rack for even cooking. Maybe also a note about the importance of not opening the oven too early to ensure even heating.

I need to structure this in a way that’s concise, using . I should start by stating the key steps: covering with foil initially, then removing it. Mention the baking time after removing foil, and the visual cue of the crust turning golden. Also, include the internal temperature check and the placement on the middle rack.

Let me draft that: “To achieve a golden-brown crust, cover the pie with foil for the first 30 minutes of baking. Remove the foil and continue baking for an additional 10-15 minutes, or until the crust is golden. Ensure the pie reaches an internal temperature of 165°F. Place the pie on the middle rack for even browning and a perfectly cooked crust every time.”

Wait, that’s . I need to cut one word. Maybe remove “every time.” at the end. So, “Place the pie on the middle rack for even browning and a perfectly cooked crust.”

Now, let me count:

To
achieve
a
golden-brown
crust,
cover
the
pie
with
foil
for
the
first
30
minutes
of
baking.
Remove
the
foil
and
continue
baking
for
an
additional
10-15minutes,
or
until
the
crust
is
golden.
Ensure
the
pie
reaches
an
internal
temperature
of
165°F.
Place
the
pie
on
the
middle
rack
for
even
browning
and
a
perfectly
cooked
crust.

That’s . I’m short by . Maybe I can add more details without overlapping. Perhaps mention the importance of proper placement to prevent burning or ensure even cooking. Or add a tip about checking the crust color towards the end.

Let me revise: “To achieve a golden-brown crust, cover the pie with foil for the first 30 minutes of baking. Remove the foil and continue baking for an additional 10-15 minutes, or until the crust is golden. Ensure the pie reaches an internal temperature of 165°F. Place the pie on the middle rack for even browning and to prevent the bottom from burning. This ensures a perfectly cooked crust.”

Now, let’s count:

To
achieve
a
golden-brown
crust,
cover
the
pie
with
foil
for
the
first
30
minutes
of
baking.
Remove
the
foil
and
continue
baking
for
an
additional
10-15
minutes,
or
until
the
crust
is
golden.
Ensure
the
pie
reaches
an
internal
temperature
of
165°F.
Place
the
pie
on
the
middle
rack
for
even
browning
and
to
prevent
the
bottom
from
burning.
This
ensures
a
perfectly
cooked
crust.

That’s . Still need two more. Maybe add a tip about rotating the pie halfway through the baking time for even browning.
Revised: “To achieve a golden-brown crust, cover the pie with foil for the first 30 minutes of baking. Remove the foil and continue baking for an additional 10-15 minutes, or until the crust is golden. Ensure the pie reaches an internal temperature of 165°F. Place the pie on the middle rack, rotating it halfway through baking for even browning and to prevent the bottom from burning. This ensures a perfectly cooked crust.”

Counting again:

To
achieve
a
golden-brown
crust,
cover
the
pie
with
foil
for
the
first
30
minutes
of
baking.
Remove
the
foil
and
continue
baking
for
an
additional
10-15
minutes,
or
until
the
crust
is
golden.
Ensure
the
pie
reaches
an
internal
temperature
of
165°F.
Place
the
pie
on
the
middle
rack,
rotating
it
halfway
through
baking
for
even
browning
and
to
prevent
the
bottom
from
burning.
This
ensures
a
perfectly
cooked
crust.

Oops, that’s . I went over. I need to trim it back. Maybe remove the part about rotating and just mention placing it on the middle rack.

Revised: “To achieve a golden-brown crust, cover the pie with foil for the first 30 minutes of baking. Remove the foil and continue baking for an additional 10-15 minutes, or until the crust is golden. Ensure the pie reaches an internal temperature of 165°F. Place the pie on the middle rack to prevent the bottom from burning and ensure even browning. This ensures a perfectly cooked crust.”
Counting:
To
achieve
a
golden-brown
crust,
cover
the
pie
with
foil
for
the
first
30
minutes
of
baking.
Remove
the
foil
and
continue
baking
for
an
additional
10-15
minutes,
or
until
the
crust
is
golden.
Ensure
the
pie
reaches
an
internal
temperature
of
165°F.
Place
the
pie
on
the
middle
rack
to
prevent
the
bottom
from
burning
and
ensure
even
browning.
This
ensures
a
perfectly
cooked
crust.

That’s . I still need two more. Maybe add a brief tip about checking the crust’s color towards the end.

Revised: “To achieve a golden-brown crust, cover the pie with foil for the first 30 minutes of baking. Remove the foil and continue baking for an additional 10-15 minutes, or until the crust is golden. Ensure the pie reaches an internal temperature of 165

Air Fryer Method for Frozen Chicken Pot Pie

The air fryer offers a quick way to cook frozen chicken pot pies. Preheat to 375°F, cook for 15-20 minutes, crispy crust and cooked filling.

3.1 Preparing the Pie for the Air Fryer

Preparation is key for cooking a frozen chicken pot pie in the air fryer. Start by preheating the air fryer to 375°F (190°C). Remove the pie from its packaging and place it on a piece of parchment paper or the air fryer basket. Poke a few small holes in the top crust with a fork to allow steam to escape. Ensure the pie is centered and flat for even cooking. This setup ensures a crispy crust and evenly cooked filling.

3.2 Cooking Time and Temperature

Cooking a frozen chicken pot pie in the air fryer requires precise timing and temperature. Set the air fryer to 375°F (190°C) and cook for 15-20 minutes. The pie is done when the crust is golden brown and the internal temperature reaches 165°F. For even cooking, shake the basket halfway through or flip the pie gently. This ensures a crispy crust and a hot, bubbly filling every time.

Thawing and Baking Instructions

Thaw frozen chicken pot pies overnight in the fridge for even baking. Preheat oven to 400°F (200°C), bake covered for 20 minutes, then uncovered until golden.

4.1 Thawing the Pie

Thawing a frozen chicken pot pie is optional but recommended for even baking. Place the pie in the refrigerator overnight or for at least 24 hours. This method ensures the filling and crust bake uniformly. Avoid thawing at room temperature to prevent bacterial growth. While not mandatory, thawing can help achieve a flakier crust and a hotter, bubblier filling when baked. Always pat the pie dry before baking to remove excess moisture.

4.2 Baking After Thawing

After thawing, preheat the oven to 375°F (190°C). Place the pie on the middle rack and bake for 40-50 minutes, or until the crust is golden brown. Cover the pie with foil for the first 20 minutes to prevent over-browning. Remove foil to allow the crust to crisp up. Ensure the internal temperature reaches 165°F for safety. Baking after thawing ensures a flaky crust and a hot, bubbly filling, perfect for a satisfying meal.

Checking Internal Temperature

Ensure the pie reaches a safe internal temperature of 165°F (75°C) for food safety. Use a meat thermometer to check the filling’s temperature accurately.

5.1 Safe Internal Temperature

Achieving a safe internal temperature of 165°F (75°C) is crucial for food safety. Use a meat thermometer to ensure the filling reaches this temperature. This step guarantees that the pie is fully cooked and safe to eat, avoiding undercooked areas. Always check the center of the pie for accuracy, as edges may heat unevenly. This temperature ensures a perfectly cooked, safe, and enjoyable meal every time.

5.2 Using a Meat Thermometer

Insert a meat thermometer into the center of the pie to ensure the internal temperature reaches 165°F. Avoid touching the crust or pan with the probe for an accurate reading. This step guarantees the filling is evenly heated and safe to consume. Always wait a few seconds for the temperature to stabilize before reading. Using a thermometer ensures a perfectly cooked pie every time, avoiding undercooked or overcooked areas.

Common Mistakes to Avoid

Common mistakes include overcooking the crust and not following package instructions. Ensure proper preheating and avoid excessive baking to prevent a burnt crust and undercooked filling.

6.1 Overcooking the Crust

Overcooking the crust can lead to a burnt or overly crispy texture, ruining the dish. To prevent this, cover the pie with foil during the initial baking phase and remove it only to achieve a golden-brown finish. Monitor the crust closely, as oven times may vary, ensuring it doesn’t overbrown. Proper coverage and timely removal are key to maintaining a perfectly cooked crust.

6.2 Not Following Package Instructions

Not following the package instructions can result in an undercooked or burnt pie. Each brand may have specific cooking times and temperatures, so ignoring these guidelines can lead to poor results. Always adhere to the recommended baking temperature and duration to ensure the filling is heated through and the crust is perfectly golden. Failure to follow instructions may result in a pie that is either too runny or overly charred.

Troubleshooting

Troubleshooting common issues like undercooked filling or burnt crust can be addressed by adjusting oven temperature or covering the pie during baking for even cooking results.

Open post

les classes de mots exercices pdf

French word classes are essential for mastering the language, providing the foundation for sentence structure and communication. Explore various resources, including PDF exercises by Marie de Charlevoix, to enhance your understanding.

1.1 Overview of Grammatical Categories

French grammar is organized into word classes, including nouns, adjectives, verbs, adverbs, pronouns, determinants, prepositions, conjunctions, and interjections. Each category plays a specific role in sentence structure, with exercises like those in Marie de Charlevoix’s PDFs helping learners identify and use them effectively. Understanding these categories is key to mastering French syntax and communication.

1.2 Importance of Understanding Word Classes

Mastering French word classes is crucial for effective communication. They determine sentence structure, meaning, and context. Understanding these categories enhances grammar, vocabulary, and language fluency. Exercises from resources like Marie de Charlevoix’s PDFs provide practical application, helping learners identify and use word classes accurately in various contexts.

Nouns (Les Noms)

Nouns are fundamental in French, representing people, places, and things. They can be common or proper, and exercises in PDF resources help practice their identification and usage effectively.

2.1 Identifying Common and Proper Nouns

Common nouns represent general categories, such as le facteur (the mailman), while proper nouns denote specific names, like l’Australie (Australia). PDF exercises often include identifying these in sentences, helping learners distinguish between the two and understand their roles in French grammar. Regular practice with such materials enhances mastery of noun classification and usage in context.

2.2 Exercises on Categorizing Nouns

Exercises on categorizing nouns involve identifying and underlining common and proper nouns in sentences. For example, in Le matin, le facteur doit prendre le courrier, learners underline matin, facteur, courrier as common nouns. PDF resources provide varied sentences, such as Le métro est arrivé dans la station, to practice distinguishing between noun types, reinforcing understanding of their grammatical roles.

Adjectives (Les Adjectifs)

Adjectives describe or modify nouns, expressing qualities like size, color, or emotion. They agree with the noun in gender and number, making them essential for precise communication.

3.1 Qualitative and Quantitative Adjectives

Qualitative adjectives describe qualities, such as size, color, or emotion (e.g., grand, heureux). Quantitative adjectives indicate quantity (e.g., trois, beaucoup). Both types must agree with the noun in gender and number. Exercises in PDF resources, like those by Marie de Charlevoix, provide ample practice to master these adjectives, ensuring precise and effective communication in French.

3.2 Practicing Adjective Agreement

Mastering adjective agreement is crucial in French. Adjectives must agree with nouns in gender (le vs. la) and number (un vs. des). PDF exercises, such as those by Marie de Charlevoix, offer practical drills to practice agreement rules. Activities include filling in blanks with correct forms of adjectives like grand or petit, ensuring learners can apply agreement accurately in various contexts.

Verbs (Les Verbes)

Verbs are essential in French, expressing actions or states. Regular and irregular verbs require careful conjugation. PDF exercises, like those by Marie de Charlevoix, provide drills to master verb forms such as parler (to speak) and être (to be).

4.1 Regular and Irregular Verbs

French verbs are categorized into regular and irregular types. Regular verbs follow predictable conjugation patterns, while irregular verbs deviate from these norms. Common examples include parler (to speak) for regular verbs and être (to be) for irregular ones. PDF exercises, such as those by Marie de Charlevoix, provide comprehensive drills to master these verb forms, essential for fluent communication.

4.2 Conjugation Exercises

Conjugation exercises are vital for mastering French verbs, covering both regular and irregular forms. PDF resources, such as those by Marie de Charlevoix, offer extensive practice, enhancing fluency and understanding of verb patterns essential for effective communication in various contexts.

Adverbs (Les Adverbes)

Adverbs modify verbs, adjectives, or other adverbs, providing details like time, place, or manner. PDF exercises offer practical drills to identify and use adverbs correctly in sentences.

5.1 Types of Adverbs

Adverbs are categorized into various types, including time, place, manner, quantity, and intensity. PDF exercises help learners identify and classify adverbs, enhancing their ability to use them effectively in sentences. These exercises also cover adverbs like “vite” (quickly) and “hier” (yesterday), providing clear examples and practice opportunities.

5.2 Using Adverbs in Sentences

Adverbs modify verbs, adjectives, or other adverbs, providing details like time, place, or manner. For example, “vite” (quickly) describes how something is done, while “hier” (yesterday) indicates time. PDF exercises, such as those by Marie de Charlevoix, offer practical sentence completion tasks, helping learners master adverb placement and usage in context, ensuring clear and effective communication in French.

Pronouns (Les Pronoms)

Pronouns replace nouns in sentences, simplifying communication. PDF exercises by Marie de Charlevoix offer practical tasks for learners to master personal and impersonal pronouns effectively.

6.1 Personal and Impersonal Pronouns

Personal pronouns like je, tu, il refer to specific subjects, while impersonal pronouns, such as on, represent indefinite subjects. PDF exercises by Marie de Charlevoix provide detailed drills for identifying and using these pronouns correctly in various contexts, enhancing sentence structure and clarity. These resources are ideal for learners seeking to refine their French grammar skills effectively.

6.2 Replacement Exercises

Replacement exercises involve substituting words with appropriate pronouns, improving grammar and clarity. PDF resources by Marie de Charlevoix offer various drills, focusing on personal and impersonal pronouns. These exercises enhance sentence structure understanding, helping learners use pronouns accurately in context, and are ideal for refining French language skills.

Determinants (Les Déterminants)

French determinants, including articles and possessive adjectives, specify nouns. Exercises in PDFs by Marie de Charlevoix help master their usage, enhancing sentence clarity and grammatical accuracy in French.

7.1 Articles and Possessive Adjectives

Determinants include articles like le, la, les and possessive adjectives such as mon, ton, son. These specify nouns, indicating gender, number, and ownership. PDF exercises by Marie de Charlevoix provide practical drills to master their correct usage in sentences, ensuring clarity and precision in French communication. Regular practice helps learners confidently apply these determinants in various contexts.

7.2 Identifying Determinants

Determinants, such as articles (le, la, les) and possessive adjectives (mon, ton, son), precede nouns to specify their gender, number, and ownership. PDF exercises, like those by Marie de Charlevoix, offer practical drills to identify and classify determinants accurately. These resources help learners recognize and apply determinants correctly in sentences, ensuring proper French syntax and meaning.

Prepositions (Les Prépositions)

Prepositions like à, en, and sur indicate relationships between words, such as location or time. They are essential for clear expression in French, as shown in PDF exercises.

8.1 Common Prepositions

Common French prepositions include à (to/at), en (in/from), sur (on/about), and pour (for). These words are used to indicate location, direction, or purpose. For example, Je vais à la plage (I’m going to the beach) uses à to show direction. PDF exercises often highlight these prepositions to help learners practice their usage in sentences, ensuring accurate and fluent communication.

8.2 Sentence Completion Exercises

Sentence completion exercises are practical tools for mastering French prepositions. Students fill in blanks using appropriate prepositions like à, en, or sur; For example, “Je pars ___ la France” requires pour. These activities, often found in PDF resources, help learners understand context and usage, ensuring accurate sentence construction and improving overall grammar skills through repetitive practice and real-life applications.

Conjunctions (Les Conjonctions)

Conjunctions connect words, phrases, or clauses. Coordinating conjunctions like et (and) and ou (or) link equals, while subordinating conjunctions like que (that) introduce dependent clauses. PDF exercises, such as those by Marie de Charlevoix, provide practice in identifying and using these connectors effectively in sentences.

9.1 Coordinating and Subordinating Conjunctions

Coordinating conjunctions like et (and) and ou (or) connect words or phrases of equal importance. Subordinating conjunctions, such as que (that) and quand (when), introduce dependent clauses. PDF exercises, including those by Marie de Charlevoix, provide ample practice in identifying and using these conjunctions effectively to link ideas in sentences, enhancing clarity and grammatical accuracy in French writing and speaking.

9.2 Connecting Words and Phrases

Connecting words and phrases are crucial for linking ideas in French. PDF exercises offer practice with conjunctions like mais (but) and donc (therefore). These resources help learners master the use of coordinating and subordinating conjunctions, ensuring smooth transitions between clauses and enhancing overall sentence coherence in both written and spoken French.

Interjections (Les Interjections)

Interjections express emotion or feeling, like oh or aïe. They often appear in exclamations, adding emphasis to a sentence. PDF exercises help practice using interjections in context, enhancing emotional expression in French communication.

10.1 Recognizing Interjections

Interjections are words that express strong emotions or reactions, such as oh, aïe, or bravo. They are often used in exclamations and can stand alone or accompany a sentence. PDF exercises, like those by Marie de Charlevoix, provide practice in identifying interjections within sentences, helping learners recognize their role in conveying emotion and emphasis in French communication effectively.

10.2 Using Interjections in Context

Interjections like oh, aïe, or bravo express strong emotions. PDF exercises, such as those by Marie de Charlevoix, provide sentences for practicing their correct usage. Learners can insert interjections into dialogues or identify them in short texts, enhancing their ability to convey emotions effectively in French. These exercises help integrate interjections naturally into everyday communication, making language use more expressive and authentic.

Mixed Exercises

Mixed exercises combine multiple word classes, testing understanding of nouns, adjectives, verbs, and more. PDF resources offer varied drills, enhancing sentence structure and practical language use effectively.

11.1 Combining Multiple Word Classes

Combining multiple word classes enhances sentence structure and practical language use. PDF exercises, such as those by Marie de Charlevoix, offer drills that integrate nouns, adjectives, verbs, and more. These activities focus on word agreement, placement, and context, helping learners build fluency and understand how different classes interact within sentences. They are ideal for advanced practice and improving overall syntax skills.

11.2 Advanced Practice Worksheets

Advanced practice worksheets offer challenging exercises to refine mastery of French word classes. They include complex sentences, nuanced contexts, and mixed-class drills. PDF resources, such as those by Marie de Charlevoix, provide detailed solutions for self-assessment. These worksheets are designed to apply knowledge in real-life scenarios, ensuring learners can confidently use word classes in various linguistic situations with precision and accuracy.

The Role of PDF Resources

Premium PDF resources like Marie de Charlevoix’s exercises offer comprehensive practice, combining theory with practical examples. They are ideal for offline learning, ensuring mastery of French word classes effectively and efficiently.

12.1 Benefits of Using PDFs

Prix, PDFs offer numerous advantages for learning French word classes. They provide offline accessibility, allowing study anywhere. Printable formats enable physical practice, enhancing retention. Consistent formatting ensures clarity across devices. Searchable content simplifies navigation. Trusted resources like Marie de Charlevoix’s exercises guarantee quality. Interactive elements, such as fillable forms, cater to diverse learning styles. These features make PDFs invaluable tools for mastering French grammar effectively.

12.2 Recommended PDF Materials

For effective learning, consider PDF resources like Marie de Charlevoix’s exercises, offering comprehensive coverage of French word classes. These materials include diverse exercises, such as identifying word categories and sentence completion tasks. They cater to various proficiency levels, ensuring structured progression. Additional resources from educational institutions provide supplementary practice, reinforcing grammar concepts. These PDFs are indispensable for systematic and efficient language acquisition.

Mastering French word classes is crucial for language proficiency. Utilize PDF resources like Marie de Charlevoix’s exercises to reinforce learning and achieve a solid grammatical foundation.

13.1 Summary of Key Points

13.2 Encouragement for Further Practice

Consistent practice is key to excelling in French word classes. Utilize PDF exercises by Marie de Charlevoix to reinforce your understanding. Regular review and application of grammatical concepts will enhance your language skills and confidence. Keep practicing, and soon mastering French word classes will become second nature to you.

Open post

princes of ash angel lawson pdf

Princes of Ash by Angel Lawson and Samantha Rue is the eighth installment in The Royals of Forsyth University series, blending dark romance and reverse harem elements with traumatic themes.

1.1 Overview of “Princes of Ash”

Princes of Ash is the eighth book in The Royals of Forsyth University series, offering a dark, intense narrative. It explores themes of power, trauma, and loyalty, with a reverse harem dynamic. The story centers on a protagonist navigating a world of secrets and abuse, culminating in a shocking revelation about the East End heir. Fans praise its emotional depth and complex characters.

1.2 Authors: Angel Lawson and Samantha Rue

Angel Lawson is a USA Today and International Bestselling Romance author known for her dark, angst-filled, and emotionally charged stories. Co-author Samantha Rue is a professional graphic designer and writer, bringing a unique visual and narrative perspective. Together, they craft compelling tales like Princes of Ash, blending trauma, power dynamics, and intense romance in their Royals of Forsyth University series.

1.3 The Royals of Forsyth University Series

The Royals of Forsyth University series, co-authored by Angel Lawson and Samantha Rue, is a dark, contemporary romance saga exploring power, loyalty, and betrayal. Princes of Ash is the eighth installment, continuing the series’ themes of trauma, reverse harem dynamics, and intense character development. The series captivates readers with its complex narratives and emotionally charged storytelling, solidifying its place in the genre.

Authors and Collaborative Writing Style

Angel Lawson and Samantha Rue’s collaboration blends dark romance with reverse harem elements, creating gripping narratives. Their teamwork results in emotionally charged and deeply complex stories.

2.1 Angel Lawson: Biography and Writing Style

Angel Lawson is a USA Today and International Bestselling author known for crafting dark, angst-filled romance novels. Her writing often explores trauma, complex relationships, and intense character development. In Princes of Ash, her vivid storytelling and emotional depth captivate readers, making her a standout in the dark romance genre.

2.2 Samantha Rue: Biography and Contribution

Samantha Rue is a professional graphic designer and co-author, bringing her unique voice to dark, twisted romances. Her collaboration with Angel Lawson in Princes of Ash infuses the story with raw emotion and intricate plot twists, enriching the narrative with her distinct perspective and creative flair, making her an integral part of the series’ success.

2.3 Their Collaboration and Creative Process

Angel Lawson and Samantha Rue’s collaboration seamlessly blends their strengths, with Rue’s graphic design background enhancing the storytelling. Their process involves intense brainstorming, balancing dark themes with complex character dynamics. Since 2020, they’ve co-written books like Princes of Ash, crafting narratives rich in trauma, loyalty, and power struggles, fostering a loyal reader base captivated by their unique voice.

Series Overview

The Royals of Forsyth University series explores dark, reverse harem romance through traumatic narratives. Princes of Ash, book 8, continues this journey with its release on November 10, 2023.

3.1 The Royals of Forsyth University Series Background

The Royals of Forsyth University series, co-authored by Angel Lawson and Samantha Rue, is a dark, reverse harem romance saga known for its complex characters and intense storylines. The series explores themes of power, loyalty, and betrayal, with a focus on traumatic narratives and intricate relationships. Its popularity stems from its unflinching portrayal of abuse, power dynamics, and family secrets, captivating readers with its raw intensity and emotional depth.

3.2 Position of “Princes of Ash” in the Series

Princes of Ash is the eighth book in The Royals of Forsyth University series, continuing the dark, twisted narrative of the Ashby family. It delves into the consequences of power struggles, family secrets, and the unraveling of loyalty. The story introduces new conflicts while deepening existing character arcs, making it a pivotal installment in the series’ progression and a must-read for fans of the saga.

Genre and Themes

Princes of Ash blends dark romance and reverse harem elements, exploring themes of trauma, abuse, and power dynamics, creating a gripping narrative of loyalty, betrayal, and intense character development.

4.1 Dark Romance and Reverse Harem Elements

Princes of Ash masterfully blends dark romance with reverse harem elements, creating a narrative filled with intense emotional connections and complex relationships. The story delves into the traumatic experiences of the characters, exploring themes of abuse, power dynamics, and loyalty. This blend of genres captivates readers with its raw, emotional depth and the intricate bonds between the protagonists, making it a compelling read for fans of the genre.

4.2 Traumatic Themes and Character Development

Princes of Ash explores profound traumatic themes, delving into the emotional and psychological struggles of its characters. The narrative masterfully portrays character development, as the protagonists navigate abuse, power dynamics, and loyalty. These elements create a gripping and emotionally charged story, offering readers a deeper understanding of the characters’ motivations and growth amidst the darkness of their world.

Plot Summary

Princes of Ash revolves around a shocking pregnancy revelation and the exposure of Rufus Ashby’s abusive reign, unraveling dark secrets and the princes’ twisted loyalty to their legacy.

5.1 Key Plot Points and Revelations

The story unfolds with a shocking pregnancy revelation at the Princes’ annual Valentines Day party, exposing Rufus Ashby’s abusive rule and his sadistic control over his sons. The protagonist’s announcement not only reveals her condition but also unmasks the dark truths about the Ashby dynasty, forcing the princes to confront their twisted legacy and the true cost of their power.

5.2 The Role of the Princes and the East End Heir

The Princes of Forsyth are bound by their royal duty to secure the East End heir, ensuring their legacy’s continuation. The pregnancy revelation intensifies their internal conflicts, as loyalty and betrayal collide. The East End heir symbolizes both power and vulnerability, forcing the princes to confront their fractured relationships and the true cost of their royal obligations.

Character Analysis

The princes are multi-dimensional, each carrying deep emotional scars and complex motivations. The female lead’s resilience and growth drive the narrative, while the princes’ darker sides emerge, revealing their true nature and the weight of their royal duties.

6.1 Main Characters: Their Roles and Motivations

The main characters in Princes of Ash are intricately crafted, each with distinct roles and motivations. The protagonist, carrying the East End heir, navigates a web of power and betrayal, while the princes, bound by their royal duties, struggle with their own dark pasts and twisted desires, driving the story’s intense dynamics and conflicts forward.

6.2 Supporting Characters and Their Impact

Supporting characters in Princes of Ash add depth and complexity to the narrative. They often serve as catalysts for the main characters’ growth, revealing hidden truths or providing emotional support. These roles, whether antagonistic or ally-like, shape the protagonists’ journeys, intensifying the story’s tension and emotional resonance while maintaining the dark, twisted atmosphere central to the series.

Reception and Reviews

Princes of Ash received a 4.5/5 rating, with over 6,610 ratings and 496 reviews. Readers praised its dark, twisted narrative, intense character development, and emotional depth.

7.1 Ratings and Reviews from Readers

Princes of Ash boasts a 4.44 rating with 6,610 ratings and 496 reviews. Readers praise its dark, reverse harem, and traumatic romance elements, highlighting strong character development, emotional depth, and the intriguing breeding link concept. The audiobook, narrated by Bridget and Jake Bordeaux, has also been well-received. However, some find the intense trauma elements challenging but impactful.

7.2 Community and Cultural Impact

Princes of Ash has sparked significant discussions in the dark romance community, with fans creating fan art and fan fiction. Its exploration of trauma and power dynamics resonates deeply, making it a viral topic on platforms like TikTok and Goodreads. The book’s themes challenge societal norms, fostering conversations about abuse, loyalty, and consent, while its unique storytelling style continues to inspire readers globally.

Cultural and Social Themes

Princes of Ash delves into themes of abuse, power dynamics, and loyalty, reflecting societal struggles. It explores betrayal’s impact on relationships and individual morality, resonating deeply with readers.

8.1 Exploration of Abuse and Power Dynamics

Princes of Ash vividly portrays the dark interplay of abuse and power, particularly through Rufus Ashby’s sadistic control over his sons. The narrative exposes how systemic abuse perpetuates cycles of fear and submission, while the protagonist’s pregnancy announcement escalates tensions, revealing the brutal hierarchies within the royal family. The story delves into emotional manipulation and the struggle for dominance, highlighting the psychological toll of such dynamics.

8.2 Themes of Loyalty and Betrayal

Princes of Ash explores the fragile balance between loyalty and betrayal, as the protagonist’s revelations about Rufus Ashby’s abuse strain bonds among the princes. Their loyalty is tested when secrets surface, leading to betrayals that ripple through the royal hierarchy. The story examines how loyalty can both unite and destroy, highlighting the devastating consequences of broken trust and shifting alliances in a toxic power structure.

Audiobook Edition

The audiobook, narrated by Bridget Bordeaux and Jake Bordeaux, brings the dark tale to life with captivating performances, enhancing the emotional depth of the story.

9.1 Narrators and Production Quality

The audiobook features skilled narrators Bridget Bordeaux and Jake Bordeaux, whose dynamic performances bring depth and emotion to the story. The production quality is excellent, with clear vocals and immersive sound effects that enhance the dark, intense narrative, ensuring an engaging listening experience for fans of the series.

9.2 Reception of the Audiobook Version

Listeners praise the audiobook for its captivating narration by Bridget and Jake Bordeaux, whose voices bring the dark, emotional story to life. The dynamic performances enhance the intense atmosphere, with many applauding the immersive experience. Fans of the series particularly appreciate how the audiobook amplifies the story’s dramatic twists and complex characters, earning it high ratings and enthusiastic reviews.

Comparison with Other Works

Princes of Ash stands out in the dark romance genre, offering a unique twist on reverse harem dynamics. It shares themes with works like Princes of Chaos and God Ash: Remnants of the Fallen, but its intense storytelling and character depth set it apart.

10.1 Similar Books in the Genre

Books like Princes of Chaos and God Ash: Remnants of the Fallen explore similar dark romance and reverse harem themes. Ashes of the Crown and VOWS OF ASH AND SHADOWS also delve into traumatic narratives, offering readers comparable emotional intensity and complex character dynamics, making them great recommendations for fans of Princes of Ash.

10.2 Comparison with Previous Books in the Series

Princes of Ash intensifies the series’ dark themes, with a focus on the East End heir and Rufus Ashby’s abusive reign. While earlier books introduced the Royals’ power dynamics, this installment deepens trauma and character development, offering a gripping continuation of The Royals of Forsyth University series with higher stakes and emotional depth.

Princes of Ash delivers a gripping, emotionally charged narrative, solidifying its place in The Royals of Forsyth University series. Fans eagerly await future works by Angel Lawson and Samantha Rue.

11.1 Final Thoughts on “Princes of Ash”

Princes of Ash is a gripping addition to The Royals of Forsyth University series, blending dark romance and reverse harem elements with intense emotional depth. The authors’ mastery of traumatic themes and complex character arcs leaves readers eager for more. With a 4.5/5 rating, this book solidifies its place as a compelling, unforgettable read in the series.

11.2 The Future of the Series and Authors

The Royals of Forsyth University series is set to expand, promising more dark, twisted narratives. With Princes of Ash as a highlight, fans anticipate a thrilling trilogy conclusion. Authors Angel Lawson and Samantha Rue will likely continue their successful collaboration, exploring new themes and maintaining their loyal fanbase with captivating storytelling and innovative projects.

Open post

tasco trail camera instruction manual

The Tasco Trail Camera is a budget-friendly, user-friendly device designed for wildlife monitoring and security․ It features motion detection, night vision, and weatherproof durability, ideal for hunters and outdoor enthusiasts․

Overview of the Tasco Trail Camera

The Tasco Trail Camera is a budget-friendly, user-friendly device designed for wildlife monitoring and security․ It features motion detection, night vision, and weatherproof durability, making it ideal for outdoor use․ With its robust design and essential features, it caters to hunters, wildlife enthusiasts, and property owners seeking reliable performance in various environments․

Importance of Reading the Instruction Manual

Reading the instruction manual is crucial for maximizing the Tasco Trail Camera’s performance․ It provides detailed guidance on installation, setup, and operation, ensuring optimal use․ The manual covers battery installation, SD card setup, and menu navigation, helping users avoid common issues and extend the camera’s lifespan․ Proper understanding of the manual ensures seamless functionality and enhances your overall experience with the device․

Quick Start Guide

The Quick Start Guide helps you set up your Tasco Trail Camera efficiently․ Start by unboxing and inserting batteries and the SD card․ Follow the manual for basic operation and menu setup to begin capturing images and videos seamlessly․

Unboxing and Initial Setup

Carefully unbox your Tasco Trail Camera, ensuring all components are included, such as the camera, mounting strap, and instruction manual․ Begin by opening the camera’s compartment to access the battery and SD card slots․ Insert the recommended batteries and an SD card, then close the compartment securely․ Turn on the camera and follow the manual’s setup instructions to start capturing images and videos effectively․

Inserting Batteries and SD Card

Open the camera by releasing the latches on the right side․ Insert 4-8 Energizer Alkaline C Cell batteries, ensuring correct polarity․ Next, place a SanDisk SD or SDHC card (up to 8GB) into the slot, aligning the pins properly․ Close the compartment securely to avoid moisture or dust․ Power on the camera and ensure the LED indicates proper function․ This setup ensures optimal performance and storage for your trail camera․

Basic Camera Operation

Power on the Tasco Trail Camera by pressing the On/Off button․ Set your desired mode (Motion Detection or Timelapse) using the Mode button․ The camera will automatically start capturing images or video when motion is detected․ Use the LED indicator to confirm the camera is active․ Ensure the camera is properly aimed and positioned for optimal results․ Refer to the manual for detailed instructions on switching modes and adjusting settings․

Parts and Controls Guide

The Tasco Trail Camera features a lens, LCD screen, power button, mode button, and LED indicators․ These components work together to ensure efficient camera operation and settings adjustment․

Understanding the Camera Components

The Tasco Trail Camera includes a high-quality lens for capturing clear images, an LCD screen for previewing photos, and buttons for navigation․ The LED indicators provide status updates, while the mounting bracket ensures secure placement․ These components are designed to work seamlessly together for optimal performance and ease of use in various outdoor conditions․

Buttons and Their Functions

The Tasco Trail Camera features a Power button to turn the device on/off, a Mode button to switch between settings, and Up/Down buttons for menu navigation․ The OK button confirms selections, while the Shutter button manually captures images․ These buttons provide easy access to the camera’s functionality, ensuring intuitive operation for users of all levels․

LED Indicators and Their Meanings

The Tasco Trail Camera features LED indicators to guide users․ The green LED signifies power status, while the red LED indicates low battery or error․ A flashing green LED signals motion detection, and a solid green LED confirms SD card activity․ These indicators provide real-time feedback, ensuring users can monitor the camera’s status and troubleshoot issues efficiently․

Battery and SD Card Installation

Install 8 Energizer Lithium AA batteries for maximum life․ Use SanDisk SD/SDHC cards up to 8GB; Refer to the manual for detailed installation steps․

Recommended Battery Types

The Tasco Trail Camera requires 8 Energizer Lithium AA batteries for optimal performance․ These batteries provide long-lasting power and reliability in extreme temperatures․ For alternative options, alkaline batteries can be used, though they may not last as long․ Avoid using rechargeable batteries, as they may not provide consistent power․ Always choose high-quality batteries to ensure proper camera function and maximize battery life․

  • Primary recommendation: Energizer Lithium AA batteries․
  • Alternative: Alkaline batteries (reduced longevity)․
  • Avoid: Rechargeable batteries due to potential performance issues․

Proper Battery Installation

Open the battery compartment by sliding the latch located on the bottom or side of the camera․ Insert the recommended batteries, ensuring correct polarity as indicated by the diagrams inside the compartment․ Avoid mixing old and new batteries․ Close the compartment securely to maintain weatherproofing․ Proper installation ensures optimal performance and prevents damage to the camera․

  • Locate and open the battery compartment․
  • Insert batteries with correct polarity․
  • Avoid mixing battery types or ages․
  • Close the compartment tightly․

SD Card Capacity and Compatibility

The Tasco Trail Camera supports SD and SDHC cards up to 8GB capacity․ Use high-quality cards like SanDisk for optimal performance․ Avoid mixing card brands or types․ Ensure the SD card is properly formatted before use․ The camera may not function with unformatted or incompatible cards․ For best results, choose a card with sufficient storage for your intended use․

  • Recommended capacity: Up to 8GB․
  • Supported types: SD and SDHC cards․
  • Format the card before use for optimal performance․

Using the Setup Menu

The Setup Menu allows users to customize camera settings, such as time, date, sensitivity, and detection range, ensuring optimal performance for specific monitoring needs․

  • Navigate through menu options using the camera’s buttons․
  • Adjust settings to suit your surveillance requirements․
  • Save changes to ensure proper camera operation․

Navigating the Menu Options

Access the menu by pressing the menu button․ Use the up and down arrows to scroll through options․ Select an option by pressing the OK button․ Adjust settings using the left and right arrows․ Save changes by exiting the menu․ Common options include time/date, sensitivity, and detection range․ Refer to the manual for detailed guidance on each setting․

  • Use arrow buttons to navigate and select menu items․
  • Adjust settings to customize camera performance․
  • Save changes before exiting the menu․

Setting Time and Date

Access the Setup Menu by pressing the menu button․ Navigate to the time/date option using the up/down arrows․ Press OK to enter the setting․ Use the left/right arrows to adjust the time and date․ Ensure the correct format (MM/DD/YYYY, HH:MM:SS) is used․ Save the changes by exiting the menu․ Accurate time/date settings are crucial for proper image stamping and event logging․

  • Use arrow keys to navigate and adjust settings․
  • Save changes to ensure accurate time/date recording․

Adjusting Sensitivity and Detection Range

Navigate to the sensitivity setting in the Setup Menu․ Use the up/down arrows to increase or decrease motion detection sensitivity․ A higher setting detects more movement, while a lower setting reduces false triggers․ Adjust the detection range to customize the camera’s trigger zone․ Press OK to save changes; Proper adjustment ensures efficient wildlife monitoring and minimizes unwanted activations․ Test settings in the field for optimal performance․

  • Higher sensitivity captures more movement but may increase false triggers․
  • Lower sensitivity reduces false activations but may miss distant subjects․

Camera Modes and Features

The Tasco Trail Camera offers versatile modes like Motion Detection, Timelapse, and Video Recording․ These features enhance wildlife monitoring and security surveillance, ensuring crisp captures day or night․

  • Motion Detection for real-time animal tracking․
  • Timelapse for time-interval image capture․
  • Video Recording for extended observation․

Motion Detection Mode

The Tasco Trail Camera’s Motion Detection Mode triggers image capture upon detecting movement, ideal for wildlife monitoring․ It offers adjustable sensitivity and detection range settings, ensuring accurate and reliable animal tracking․ Users can customize these settings via the Setup Menu to suit their specific needs, optimizing battery life and memory card usage for efficient performance in the field․

  • Detects movement within a customizable range․
  • Adjustable sensitivity for reduced false triggers․
  • Perfect for capturing images of animals without human interference․
  • Enhances battery life by minimizing unnecessary captures․
  • Works seamlessly with night vision for 24/7 monitoring․

Timelapse Photography

The Tasco Trail Camera features a Timelapse Photography mode, allowing users to capture images at regular intervals․ This mode is ideal for monitoring long-term changes in the environment, such as seasonal variations or animal migration patterns․ Users can set custom intervals, ensuring consistent and reliable image capture without relying on motion detection․

  • Capture images at adjustable time intervals․
  • Monitor environmental changes over time․
  • Useful for observing seasonal patterns or animal behavior․
  • Customizable intervals for tailored results․
  • Perfect for time-lapse studies or prolonged surveillance․

Video Recording Options

The Tasco Trail Camera offers versatile video recording options, allowing users to capture clips in various resolutions․ Videos can be recorded with or without sound, and the duration can be adjusted based on user preferences․ This feature is ideal for detailed observations of wildlife behavior or security monitoring, providing valuable insights into activity patterns․

  • Adjustable video resolution for clear footage․
  • Customizable clip length to suit monitoring needs․
  • Option to enable or disable audio recording․
  • Perfect for capturing detailed animal behavior or security events․
  • Enhances surveillance capabilities with flexible settings․

Image and Video Quality Settings

The Tasco Trail Camera allows users to adjust resolution, night vision sensitivity, and image stamp features for optimal photo and video clarity in various conditions․

  • Multiple resolution options for images and videos․
  • Night vision settings to enhance low-light captures․
  • Customizable image stamps for time, date, and more․

Resolution Options

The Tasco Trail Camera offers multiple resolution settings to suit your needs․ Choose from 8MP, 4MP, or 2MP for images, ensuring clarity while managing storage capacity․ Higher resolutions provide sharper details but consume more memory, while lower settings save space․ The camera allows you to adjust these settings via the menu, enabling flexibility for different surveillance or wildlife monitoring scenarios․ Refer to the manual for guidance on selecting the optimal resolution for your use case․

  • 8MP: High detail for clear images․
  • 4MP: Balanced quality and storage․
  • 2MP: Compact files for extended use․

Night Vision Settings

The Tasco Trail Camera features advanced night vision settings, enabling clear imagery in low-light conditions․ Users can adjust sensitivity levels to optimize motion detection at night․ The camera also offers options to enable or disable infrared LEDs, balancing image quality with battery life․ Refer to the manual for guidance on configuring these settings for optimal nighttime performance․

Image Stamp Features

The Tasco Trail Camera offers customizable image stamp features, allowing users to embed date, time, and camera ID on captured photos․ This feature is particularly useful for tracking wildlife patterns and verifying footage authenticity․ The manual provides detailed instructions on enabling and adjusting these settings to suit individual preferences and monitoring needs․

Maintenance and Troubleshooting

Regularly clean the lens to ensure clear images․ Check for firmware updates and refer to the manual for troubleshooting common issues like battery life or SD card errors․

Cleaning the Camera Lens

Regularly clean the lens to maintain image clarity․ Use a soft, dry microfiber cloth to wipe away dirt and smudges․ For stubborn marks, lightly dampen the cloth with distilled water․ Avoid harsh chemicals or abrasive materials that could scratch the lens․ Never touch the lens surface with your fingers, as oils can leave residue․ For debris, gently brush with a soft-bristled lens brush before cleaning․ Proper maintenance ensures optimal performance and clear photos․

Common Issues and Solutions

If the camera fails to turn on, ensure batteries are installed correctly and not depleted․ For blurry images, check that the lens is clean and free of obstructions․ If the SD card isn’t detected, format it using the camera’s menu or try a different compatible card․ Motion detection issues may require adjusting sensitivity settings․ Refer to the manual for troubleshooting steps or reset the camera to factory settings if problems persist․

Resetting the Camera to Factory Settings

To reset the Tasco Trail Camera to factory settings, access the Setup Menu and navigate to the “Reset” option; Select “Factory Reset” and confirm the action․ This will restore default settings, erasing all custom configurations․ Ensure all important settings are noted before performing the reset, as they will be lost․ This step is useful for resolving persistent issues or preparing the camera for new ownership․

Mounting and Placement Tips

Mount the Tasco Trail Camera in a location with clear visibility of the target area․ Ensure the camera is securely fastened to a stable object․ Position it at an optimal height to avoid false triggers and ensure durability in various weather conditions․

Choosing the Best Location

When selecting a location for your Tasco Trail Camera, ensure it provides a clear line of sight to the target area․ Avoid positioning near dense vegetation or obstructions that could block motion detection․ Mount the camera at an optimal height to minimize false triggers and ensure it captures the desired field of view․ Consider game trails or paths frequently used by wildlife for better results․

Securing the Camera

To ensure your Tasco Trail Camera remains safe and functional, use the provided mounting strap to secure it to a sturdy tree or post․ Tighten the strap firmly to prevent movement caused by wind or animals․ For added security, consider using a lockbox or cable lock to deter tampering or theft․ Always check the camera’s stability after installation to ensure it remains level and secure․

Weatherproofing and Durability

The Tasco Trail Camera is designed to withstand harsh outdoor conditions, featuring a weatherproof casing that protects against rain, snow, and extreme temperatures․ Its durable construction ensures long-lasting performance in rugged environments․ The camera’s sealed design prevents moisture ingress, while its robust materials provide resistance to physical impacts․ This ensures reliable operation and clear image capture in various weather conditions, making it ideal for outdoor surveillance and wildlife monitoring․

Congratulations on mastering your Tasco Trail Camera! For further assistance, refer to the official manual or visit Tasco’s support website for troubleshooting guides and updates․

Final Tips for Optimal Use

For the best results, position the camera at waist height and angle it toward trails․ Use high-quality batteries and ensure the SD card has sufficient storage․ Regularly inspect the weatherproof seals and clean the lens for clarity․ Check the camera’s placement and settings periodically to ensure optimal performance․ Refer to the manual or Tasco’s support website for additional guidance and troubleshooting․

Where to Find Additional Support

For further assistance, visit Tasco’s official website or refer to the instruction manual․ Additional resources and troubleshooting guides are available on platforms like ManualsLib or ManualsPlus․ Contact Tasco’s customer support for personalized help or visit their support page for FAQs and contact details․

Open post

examen professionnel oiq exemple pdf

Understanding the Professional Exam of the Ordre des Ingénieurs du Québec (OIQ)

The OIQ professional exam assesses engineering competence, focusing on ethics, legal frameworks, and professional responsibilities. Administered in French, it features multiple-choice questions, ensuring adherence to Quebec’s professional standards.

Overview of the Exam Structure and Requirements

The OIQ professional exam is a 3-hour, French-language assessment consisting of approximately 100 multiple-choice questions. It evaluates knowledge of Quebec’s legal and ethical frameworks, professional responsibilities, and engineering competencies. Candidates must demonstrate understanding of the profession’s ethical code and legal obligations, as well as practical skills in project management and problem-solving. The exam is designed to ensure compliance with Quebec’s professional standards, making it a critical step in obtaining certification as a professional engineer in the province.

Importance of the Exam in Professional Certification

The OIQ professional exam is a mandatory step for engineering certification in Quebec, ensuring engineers meet legal and ethical standards. It verifies technical knowledge and ethical understanding, essential for professional practice. Passing the exam grants the right to practice as a certified engineer, enhancing credibility and career opportunities. It also upholds public trust by maintaining high professional standards, making it a cornerstone of professional certification for engineers in the province.

Preparation Guide for the OIQ Professional Exam

Prepare by studying the official 2019-2020 guide, focusing on key sections. Practice with past exam papers and multiple-choice questions to enhance time management and accuracy.

Key Topics and Study Materials

Focus on Quebec’s professional system, ethics, and legal frameworks. Utilize the 2019-2020 study guide and past exam papers with solutions to understand exam structure. Review engineering projects and problem-solving techniques, practicing with multiple-choice questions to improve readiness. Ensure thorough preparation by exploring resources like PDF guides and participating in webinars for updated insights and practical applications of professional standards.

Effective Strategies for Exam Success

Develop a structured study plan, prioritizing key topics like ethics and professional regulations. Regularly practice with past exam questions to familiarize yourself with the format. Engage in active learning by participating in webinars and seminars to deepen understanding. Utilize the official study guide and supplementary resources to reinforce knowledge. Time management and consistent review are crucial to mastering the multiple-choice format and ensuring readiness for the professional challenges assessed in the exam.

Sample Questions and Exam Examples

The OIQ exam includes multiple-choice questions covering professional ethics, legal frameworks, and engineering practices. Past exam papers and solutions are available for practice, ensuring preparedness for the assessment.

Reviewing Past Exam Papers and Solutions

Reviewing past exam papers and solutions is crucial for understanding the exam format and content. These resources provide insights into typical questions, helping candidates identify key topics and improve time management. Solutions offer detailed explanations, clarifying complex concepts and common pitfalls. By analyzing past papers, candidates can familiarize themselves with the exam structure, including multiple-choice questions and case studies. This practice enhances problem-solving skills and ensures a thorough understanding of professional ethics, legal frameworks, and engineering practices. Utilizing these resources significantly boosts exam preparedness and confidence.

Practicing with Multiple-Choice Questions

Practicing with multiple-choice questions is essential for success in the OIQ professional exam. These questions simulate the actual exam format, helping candidates become familiar with the structure and content. By reviewing past papers and solutions, candidates can identify recurring themes and improve their problem-solving skills. Regular practice enhances time management and reinforces key concepts, such as professional ethics and legal frameworks. Focusing on high-weightage areas ensures targeted preparation, while analyzing incorrect answers helps eliminate common mistakes. This practice builds confidence and ensures readiness for the exam.

Ethical and Professional Considerations

Ethical and professional considerations are central to the OIQ exam, focusing on the code of ethics and engineers’ responsibilities; These principles guide decision-making and professional conduct, ensuring integrity and accountability in engineering practice.

Understanding the Code of Ethics for Engineers

The Code of Ethics for Engineers outlines professional conduct principles, ensuring integrity, responsibility, and respect for public safety. It emphasizes honesty, confidentiality, and avoiding conflicts of interest. Engineers must adhere to these ethical standards, reflecting their commitment to societal well-being and maintaining public trust. The code serves as a foundation for decision-making, guiding engineers to act responsibly and ethically in their practice. Understanding and applying these principles is essential for engineers, as they are personally responsible for their actions and must uphold the profession’s reputation and ethical obligations.

Case Studies and Real-World Applications

Case studies provide practical insights into ethical dilemmas and professional challenges engineers may encounter. For example, managing conflicts of interest or ensuring public safety in projects. Real-world applications demonstrate how ethical principles guide decision-making, such as prioritizing environmental sustainability or resolving conflicts between clients and stakeholders. These scenarios help engineers develop problem-solving skills and understand the consequences of their actions. By analyzing such cases, engineers can better apply ethical frameworks to real-world situations, ensuring responsible and professional conduct in their practice. These examples are often included in study materials to prepare for the OIQ exam.

Legal and Regulatory Framework

The OIQ exam covers Quebec’s legal framework for engineers, focusing on professional standards, ethical practices, and regulatory compliance. It ensures engineers understand and adhere to provincial laws and codes.

Role of the OIQ in Professional Regulation

The OIQ plays a crucial role in regulating engineering professionals in Quebec. It ensures compliance with legal standards, oversees professional conduct, and administers exams to certify engineers. The OIQ also handles inspections and investigates ethical violations to maintain public trust. By setting strict guidelines and enforcing them, the OIQ ensures that engineers meet the necessary qualifications and adhere to the profession’s ethical code, thereby safeguarding public safety and upholding professional integrity.

Compliance with Quebec’s Professional Standards

Adherence to Quebec’s professional standards is mandatory for engineers. The OIQ ensures that all licensed professionals meet these standards, which include ethical practices, legal requirements, and technical competencies. Regular audits and inspections are conducted to verify compliance, and non-compliance may result in disciplinary actions. These standards are designed to protect public safety and maintain the integrity of the engineering profession in Quebec.

Project Management and Practical Skills

Engineers must demonstrate proficiency in managing projects, including planning, execution, and monitoring. Practical skills like problem-solving, decision-making, and site inspections are essential for professional competence in Quebec.

Examples of Engineering Projects and Their Evaluation

Engineering projects, such as designing a pumping station or conducting structural analysis, demonstrate practical skills. Evaluations focus on planning, execution, and compliance with professional standards. The OIQ assesses projects for technical accuracy, safety, and ethical considerations, ensuring engineers meet Quebec’s professional requirements. These examples highlight problem-solving abilities, teamwork, and adherence to regulations, all critical for professional certification and lifelong learning in the field.

Developing Problem-Solving and Decision-Making Abilities

The OIQ exam emphasizes developing strong problem-solving and decision-making skills, essential for engineers. Through case studies and real-world applications, candidates learn to analyze complex situations, evaluate risks, and implement ethical solutions. These abilities are critical for professional practice, ensuring engineers can navigate challenges effectively while adhering to legal and ethical standards. Continuous learning and practical experience further enhance these competencies, preparing engineers to excel in their roles and contribute to society responsibly.

Continuous Professional Development

Ongoing learning is vital for engineers to stay updated with industry advancements. The OIQ encourages participation in seminars and workshops to maintain professional competency and ethical standards.

Importance of Lifelong Learning in Engineering

Lifelong learning is essential for engineers to adapt to technological advancements and industry changes. It ensures they remain competent, innovative, and compliant with professional standards. By engaging in continuous education, engineers can enhance their problem-solving skills and stay updated on ethical practices. The OIQ emphasizes the need for ongoing development through seminars, workshops, and self-study. This commitment to learning not only benefits individual careers but also contributes to the overall quality and safety of engineering projects in Quebec.

Resources for Ongoing Education and Training

The OIQ offers various resources to support engineers in their continuous professional development. These include online courses, webinars, and workshops focused on ethics, legal frameworks, and emerging technologies. Additionally, study guides and past exam papers are available to help prepare for the professional exam. Engineers can also participate in seminars and scientific meetings to stay informed about industry trends. These resources ensure engineers maintain their competence and stay aligned with Quebec’s professional standards, fostering a culture of lifelong learning and excellence in the field.

Open post

manuel de facturation des médecins spécialistes pdf

Medical specialist billing is a critical process ensuring accurate reimbursement for specialized care services. It involves precise coding, compliance with regulations, and efficient claims submission to maintain financial health.

1.1 Understanding the Importance of Accurate Billing

Accurate billing is essential for ensuring proper reimbursement and maintaining trust between healthcare providers and payers. Errors in billing can lead to delayed payments, disputes, or even legal issues. By adhering to standardized coding systems and verifying patient data, specialists can minimize errors and streamline the billing process. Accurate billing also ensures compliance with regulatory requirements, reducing the risk of audits and penalties. Additionally, it fosters transparency and trust with patients, who receive clear and correct invoices for services rendered. Implementing robust billing practices is crucial for the financial sustainability of medical practices and the delivery of high-quality patient care.

1.2 Overview of the Billing Process for Specialists

The billing process for medical specialists involves several key steps to ensure accurate and timely reimbursement. It begins with patient registration and verification of insurance coverage. Next, clinical staff document the services provided, including diagnoses and procedures. This information is then translated into standardized codes using systems like ICD and CPT. A claim is prepared and submitted to the payer, either electronically or manually. After processing, the payer issues payment, and any remaining balance is billed to the patient. Regular follow-up is essential to address denied claims or discrepancies. Compliance with regulations and payer-specific guidelines ensures a smooth process, minimizing delays and errors.

Key Elements of a Billing Manual for Specialists

A billing manual for specialists should include compliance guidelines, detailed coding instructions, and step-by-step processes for claim submission and payment tracking to ensure efficiency.

2.1 Structure and Content of the Manual

A billing manual for specialists should be organized into clear sections, starting with an introduction to billing principles. It should include detailed guides on compliance, coding systems like CPT and ICD-10, and step-by-step billing procedures. Additional sections should cover claim submission processes, payment tracking, and handling denials or appeals. The manual should also provide templates for invoices and forms, such as those for travel expenses, and include examples of specific codes, like code de facturation 09990. A troubleshooting section and a glossary of terms ensure clarity and ease of use. This structure ensures all aspects of billing are comprehensively addressed.

2.2 Essential Sections Every Manual Should Include

Every billing manual should include sections on compliance standards, detailed coding guidelines, and step-by-step billing procedures. A dedicated chapter on understanding payment terms and reimbursement processes is vital. Additionally, the manual should cover how to handle denied claims and appeals, providing clear examples. A section on travel expense billing, including forms like Facture de frais de déplacement, ensures accuracy. Finally, a troubleshooting guide and a glossary of terms should be included to address common issues and clarify industry-specific language. These sections ensure the manual is practical, comprehensive, and user-friendly for medical specialists.

Billing Codes and Classification Systems

Medical billing relies on standardized codes like ICD and CPT to classify diagnoses and procedures. These systems ensure accurate claims submission and compliance with insurance requirements.

Medical coding systems are essential for standardized documentation of diagnoses and procedures. The most common systems include ICD (International Classification of Diseases) and CPT (Current Procedural Terminology). These systems provide a universal language for healthcare professionals to classify conditions and treatments accurately. ICD codes are used to identify diseases and health conditions, while CPT codes specify medical, surgical, and diagnostic services. Accurate coding ensures proper billing, reimbursement, and compliance with regulatory requirements. Specialists rely on these systems to document patient care effectively and maintain precise records for insurance claims. Proper use of coding systems is vital for efficient and error-free billing processes.

3.2 Specific Codes for Specialist Services

Specialist services require precise coding to ensure accurate billing and reimbursement. Codes like CPT (Current Procedural Terminology) and HCPCS (Healthcare Common Procedure Coding System) are often used. Each specialty has unique codes, such as E&M (Evaluation and Management) codes for consultations or procedures. For example, cardiology may use specific codes for echocardiograms, while orthopedics might use codes for joint injections. Accurate code selection ensures compliance with payer guidelines and avoids claim denials. Specialists must stay updated on coding changes to reflect current practices. Proper documentation and coding ensure seamless reimbursement and maintain trust with patients and payers. Regular training and reference materials, like billing manuals, are essential for mastering these codes.

Billing Software and Tools for Specialists

Specialists use billing software like Kareo or AdvancedMD for streamlined claims and compliance. These tools offer real-time eligibility checks and custom reporting, enhancing billing accuracy and efficiency.

4.1 Overview of Popular Billing Software

Popular billing software for specialists includes Kareo, Athenahealth, and AdvancedMD. These tools offer comprehensive solutions for medical billing, with features like real-time claims tracking, payment processing, and compliance support. Kareo is known for its user-friendly interface and integration with EHR systems, while Athenahealth provides robust analytics and automated workflows. AdvancedMD stands out for its customizable templates and scalability for growing practices. These platforms streamline billing processes, reduce errors, and improve revenue cycle management, making them essential for specialists to maintain financial efficiency and focus on patient care.

4.2 Features to Look for in Billing Tools

When selecting billing tools for medical specialists, key features to prioritize include real-time claims tracking, automated coding verification, and integrated payment processing. Tools should offer customizable reporting to monitor financial performance and seamless EHR integration for streamlined workflows. Compliance alerts ensure adherence to billing regulations, while scalability supports growing practices. A user-friendly interface reduces training time, and robust security features protect patient data. Additionally, customer support and regular updates are essential for addressing issues and adapting to industry changes. These features collectively enhance efficiency, reduce errors, and optimize revenue cycle management for specialist practices.

Legal and Compliance Considerations

Adhering to legal standards is crucial for medical billing. Compliance ensures accurate claims, avoids penalties, and maintains patient trust, safeguarding both practitioners and healthcare institutions legally.

5.1 Understanding Billing Regulations

Understanding billing regulations is essential for compliance and accuracy. These rules ensure that medical billing aligns with legal and ethical standards, preventing fraud and errors. Key areas include coding systems like CPT and ICD-10, which must be used correctly. Billing specialists must also comply with privacy laws such as HIPAA to protect patient data. Additionally, regulations govern how claims are submitted to insurance providers, including timelines and documentation requirements. Failure to adhere to these guidelines can result in denied claims, fines, or legal action. Staying informed about updates to billing regulations is crucial for maintaining compliance and ensuring smooth reimbursement processes for healthcare providers. This knowledge helps specialists avoid costly mistakes and ensures transparency in billing practices.

5.2 Avoiding Common Compliance Mistakes

Avoiding common compliance mistakes is crucial for maintaining integrity in medical billing; One of the most frequent errors is incorrect or outdated coding, which can lead to denied claims. Another mistake is failing to provide adequate documentation to support billed services. Billing specialists must also ensure compliance with privacy laws, such as HIPAA, to protect patient information. Additionally, neglecting to stay updated on regulatory changes can result in non-compliance. To mitigate these risks, regular audits and staff training are essential. Implementing robust verification processes for codes and documentation can further reduce errors. By addressing these areas, specialists can minimize compliance issues and ensure seamless billing operations.

Best Practices for Efficient Billing

Efficient medical billing requires streamlined processes, accurate coding, and regular audits. Implementing robust software and training staff ensures compliance and reduces errors, enhancing overall financial performance.

6.1 Streamlining the Billing Process

Streamlining the billing process involves implementing efficient workflows, reducing manual data entry, and leveraging automation tools. By integrating electronic health records (EHR) with billing software, practices can minimize errors and accelerate reimbursement. Regularly reviewing and updating billing codes ensures compliance with regulations. Training staff on best practices, such as verifying patient eligibility and accurately documenting services, further enhances efficiency. Utilizing tools like claim scrubbers can help identify and correct issues before submission. Standardizing procedures and maintaining clear communication between clinical and billing teams are essential for a seamless process. These strategies reduce delays, improve accuracy, and ensure timely payment for specialist services.

6.2 Tips for Reducing Errors

To minimize billing errors, ensure accurate data entry by verifying patient demographics and service details. Regularly update coding systems to reflect current guidelines. Double-check claims for completeness before submission. Train staff on common pitfalls, such as incorrect modifiers or outdated codes. Implement automated tools like claim scrubbers to identify potential issues. Conduct regular audits to identify recurring mistakes and address them promptly. Maintain clear communication between clinical and billing teams to prevent discrepancies. Establish a system for tracking and resolving unpaid claims. By combining these strategies, practices can significantly reduce errors, improve reimbursement rates, and enhance overall operational efficiency. Consistency and attention to detail are key.

Scroll to top